Screen recording on your iPhone 14 is a simple process! By adding the screen recording feature to your Control Center, you can easily capture important moments, from pesky bugs to cherished video calls. Here’s a detailed guide on activating and using this feature.
Introduction
In today’s tech-savvy world, being able to record your iPhone’s screen can be incredibly useful. Whether you’re creating tutorials, capturing gameplay, or documenting software bugs, this feature is essential for both professionals and casual users alike. With the iPhone 14’s advanced capabilities, your recordings will look more professional than ever.
Step by Step Tutorial: How to Initiate Screen Recording on iPhone 14
Before diving into the mechanics, it’s essential to understand the functionality of screen recording. This feature transforms your iPhone into a mini camcorder, ready to capture digital moments in high quality.
Step 1: Add Screen Recording to Control Center
First, navigate to Settings > Control Center, then tap the plus icon next to Screen Recording to include it in your quick access tools. This step ensures that the screen recording feature is readily accessible whenever you need it.
Step 2: Access the Control Center
Swipe down from the top-right corner of your screen to open the Control Center. This hub gives you quick access to a myriad of features without the need to delve into the full settings menu.
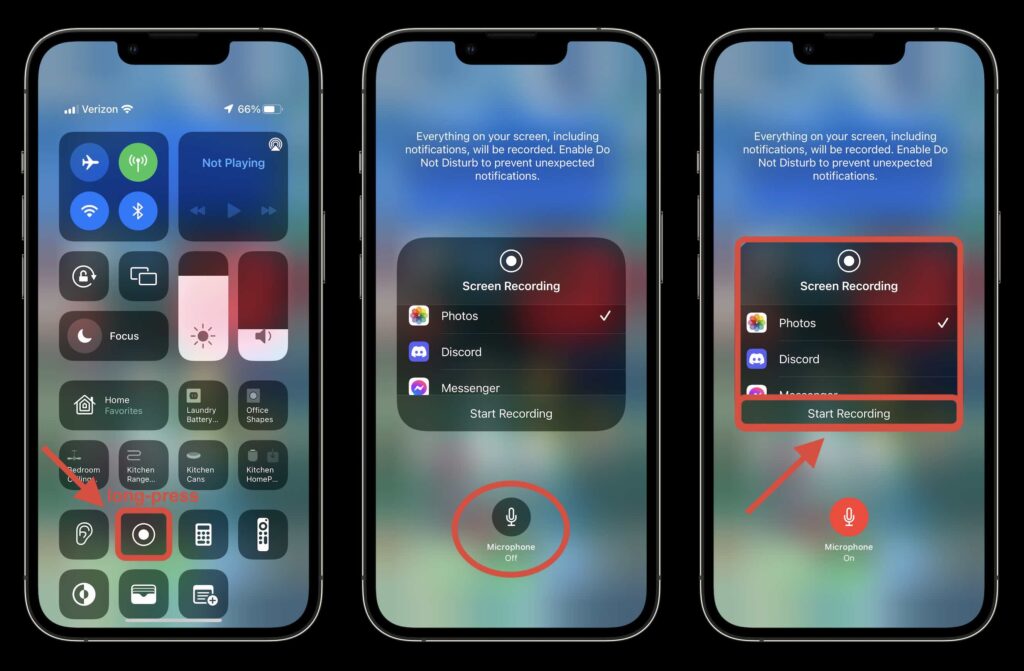
Step 3: Start Your Recording
Tap the screen recording icon — a solid circle within a ring — and prepare for a three-second countdown. Use this short interval to navigate to the app or screen you wish to capture. Ready, set, record!
Step 4: End Your Recording
Once you are done, tap the red status bar at the top of your screen and select ‘Stop’. It’s crucial to manually stop the recording to ensure your content is saved correctly.
After Recording: What’s Next?
After stopping the recording, the video is saved directly to the Photos app. From here, you can view, edit, and share your recording. Editing options include trimming the start and end for a cleaner presentation and adding filters to enhance visual appeal.
Helpful Tips for Effective Screen Recording
| Tip | Details |
|---|---|
| Storage Management | Ensure your iPhone has sufficient storage space before starting a recording as videos can be quite large. |
| Do Not Disturb | Activate Do Not Disturb mode to avoid interruptions from notifications during your recording session. |
| Microphone Audio | To capture audio along with your video, press and hold the screen recording icon and activate the microphone. |
Frequently Asked Questions
How do I add screen recording to the Control Center on my iPhone 14?
You can add it by going to Settings > Control Center and tapping the plus icon next to Screen Recording.
Can I record sound while screen recording?
Yes, activate the microphone by pressing and holding the screen recording button before you start recording.
Where are my screen recordings saved?
All recordings are automatically stored in the Photos app under the ‘Videos’ album.
How long can I screen record?
The duration is only limited by the available storage space on your iPhone.
Final Thoughts: Capture and Create with Ease
Screen recording on the iPhone 14 simplifies capturing and sharing high-quality videos of your screen activities. Whether you’re dealing with professional tasks, capturing live events, or just saving personal memories, this tool is incredibly effective. Remember, thoughtful storage management and privacy considerations will help you maximize the use of this powerful feature. Happy recording! What will you capture next?
“`”